
Right Ball: How UK squash club temperature checker is boosting numbers
Written by I Dig Sports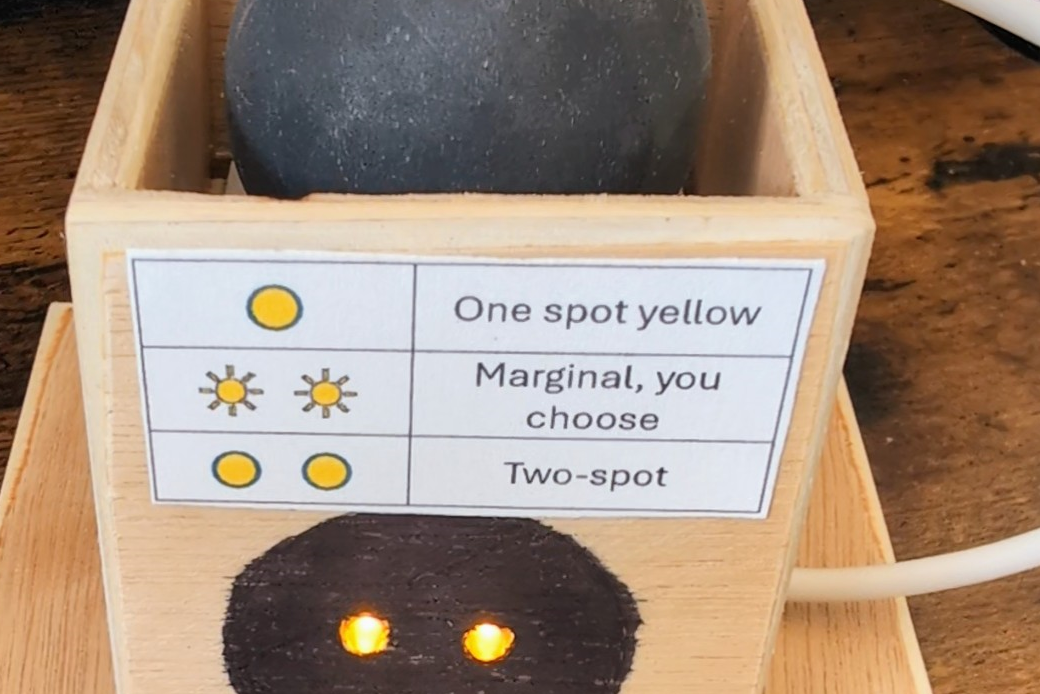
At Grove Park Squash Club in Cheadle, we are passionate about getting new players into the game, writes Chris Sargent.
One of the biggest blockers is the obsession with a double yellow, regardless of the standard. This kills beginners enjoyment of the game.
So, we set about thinking how to make the decision as to which ball to use simple.
READ MORE: Our Right Ball Squash Ball campaign
This home-made Squash Ball Temperature Sensor will do just that.
The idea is that players warm up with the double dot as they would normally. Come off court and pop it in the sensor. If it is two cold, it will suggest they switch to a single yellow, if it is marginal, it will indicate that, and if it is hot enough, suggest they just crack on.
So, to support the Squash Mad Right Ball Campaign, here are some instructions for clubs to build there own Ball Temperature Check device. Components cost somewhere between 20 and 30. I only used the Seeed Studio Xiao nRF52840 because I had it hanging around not doing anything.
It would be easy enough to use a different microcontroller with only slight modifications (ChatGPT is your friend!!)
I have set the temperature range as below:
- < 29 Degrees shows a single solid yellow use a one spot yellow
- >29 Degrees <33 Degrees Shows flashing double yellow marginal, think about a one spot
- >33 degrees use a double dot
Now, whether these are the right values is debatable, this just seemed to be a consensus.
And here is a demo of the device:
As you can see immediately, I am no carpenter
- Parts List
To build this device, youll need the following components:
Electronics:
- Seeed Studio Xiao nRF52840 (microcontroller)
- MLX90614 Infrared Temperature Sensor (for measuring ball temperature)
- 2x Yellow LEDs (for visual feedback)
- 2x 220Ω resistors (for current limiting with the LEDs)
- USB-C cable (for powering the Xiao and uploading code)
- Jumper wires (for connecting components)
Tools:
- Soldering iron (optional but recommended for secure connections)
- Breadboard (for testing connections before soldering)
- 3D printer or craft materials (for building an enclosure)
- Device Build Instructions
Step 1: Connect the MLX90614 to the Xiao
- SCL (clock) on the MLX90614 goes to the A4 (SCL) pin on the Xiao.
- SDA (data) on the MLX90614 goes to the A5 (SDA) pin on the Xiao.
- VCC (power) on the MLX90614 goes to the 3.3V pin on the Xiao.
- GND on the MLX90614 goes to any GND pin on the Xiao.
Step 2: Connect the LEDs
- First LED (for <29C):
- Anode (+) to pin D1 on the Xiao.
- Cathode (-) through a 220Ω resistor to GND.
- Second LED (for flashing and >33C):
- Anode (+) to pin D2 on the Xiao.
- Cathode (-) through a 220Ω resistor to GND.
Step 3: Power the Device
- Connect the Xiao to a USB-C cable, which will provide power and allow you to upload the code.
Step 4: Test Your Connections
- Use a breadboard for initial testing to ensure everything is connected correctly before soldering.
- Once tested, solder the connections for a more permanent build.
- Programming Instructions
Step 1: Install Arduino IDE
- Download and install the Arduino IDE from arduino.cc.
- In the Arduino IDE, install support for Seeed Studio Xiao nRF52840:
- Go to File > Preferences and add the following URL in the Additional Board Manager URLs field:
https://files.seeedstudio.com/arduino/package_seeeduino_boards_index.json
- Go to Tools > Board > Board Manager and search for Seeeduino nRF52 to install the package.
Step 2: Install Required Libraries
- Go to Sketch > Include Library > Manage Libraries.
- Search for and install the Adafruit MLX90614 library.
Step 3: Upload the Code
- Copy the code below into a new Arduino sketch:
| #include #include Adafruit_MLX90614 mlx = Adafruit_MLX90614(); const int led1Pin = D1; const int led2Pin = D2; void setup() { Serial.begin(9600); if (!mlx.begin()) { Serial.println(Error connecting to MLX90614 sensor!); while (1); } pinMode(led1Pin, OUTPUT); pinMode(led2Pin, OUTPUT); digitalWrite(led1Pin, LOW); digitalWrite(led2Pin, LOW); } void loop() { double temperature = mlx.readObjectTempC(); Serial.print(Temperature: ); Serial.println(temperature); if (temperature < 29.0) { digitalWrite(led1Pin, HIGH); digitalWrite(led2Pin, LOW); } else if (temperature >= 29.0 && temperature < 33.0) { flashBothLEDs(); } else if (temperature >= 33.0) { digitalWrite(led1Pin, HIGH); digitalWrite(led2Pin, HIGH); } delay(1000); } void flashBothLEDs() { digitalWrite(led1Pin, HIGH); digitalWrite(led2Pin, HIGH); delay(250); digitalWrite(led1Pin, LOW); digitalWrite(led2Pin, LOW); delay(250); } |
- Select the Xiao board under Tools > Board > Seeeduino nRF52 Boards > Seeed Xiao nRF52840.
- Select the correct COM port under Tools > Port.
- Click the Upload button to upload the code to your Xiao.
- Tips for Building an Enclosure
Material Options:
- 3D Printing: A 3D-printed enclosure is the most customizable option. You can design a box with an opening for the infrared sensor and slots for the LEDs.
- Acrylic or Perspex: Ensure any enclosure allows the sensor to have a direct line of sight to the ball. Avoid materials like perspex or plastic in front of the sensor, as they may interfere with infrared readings.
- Simply Plywood: Key thing is to make sure that the sensor has a clear line of site to the ball, within 3 cm, and the hold for the sensor does not interfere with the line if site (35 degree view angle) i.e. if it is think ply, the hole needs to be big!
- Foam or Plastic Housing: If you dont have access to a 3D printer, using lightweight plastic or foam board can work to build a simple enclosure that holds the components securely.
Important Considerations:
- Direct Line of Sight for the Sensor: The MLX90614 sensor should not be obstructed by any material that interferes with infrared measurements. Ensure the sensor has a direct line of sight to the ball.
- LED Visibility: Place the LEDs so that users can easily see them from outside the enclosure.
- Ventilation: If the components heat up, ensure theres proper ventilation to avoid affecting the sensor readings.
- Mounting the Sensor: Ensure the sensor is securely mounted and positioned about 1-3 cm from where the ball will be placed.
Final Notes:
- Testing: After building the device and uploading the code, test it with a real squash ball at different temperatures to ensure it works as expected.
- Adjustments: If you notice temperature inaccuracies due to mounting or distance issues, adjust the distance between the sensor and the ball or fine-tune the temperature thresholds in the code.


 Phone: (800) 737. 6040
 Fax: (800) 825 5558
 Website:
  Email:


